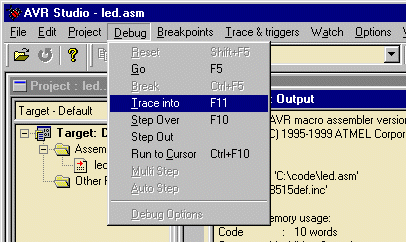
At this point we have generated the files needed to simulate the code. To start running the code select "trace into" from the "Debug" menu, or press <F11>.
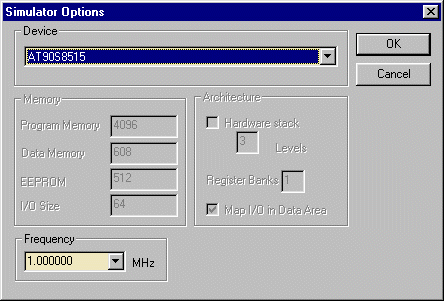
You will now get the window shown below. Since we do not have an In-Circuit Emulator attached, AVR Studio enters simulator mode. In the Simulator Options window you select the device that you wish to simulate the code for. Select AT90S8535 as the device. Leave the frequency at the default value and press "OK" to continue. The Memory and Architecture is not used since we have selected a standard device. These options are used when selecting "Custom" as device.
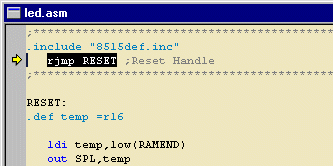
Now take a look in the editor view, you'll see that a yellow right-arrow has appeared in the left margin of the code. This arrow indicates the position of the program counter. In other words, it points to the next instruction to be executed. What we want to do now is to set up the IO views so that we can have a closer look at what is happening on PortB registers during program execution.
Open the IO window by pressing the "Create new IO window"
![]() button. Since we have selected the AT90S8535 during the Simulator
options setting this IO view will be opened automatically.
button. Since we have selected the AT90S8535 during the Simulator
options setting this IO view will be opened automatically.
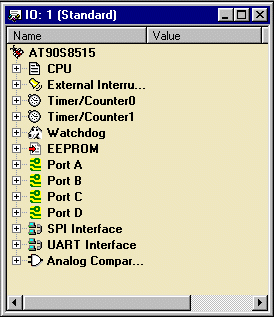
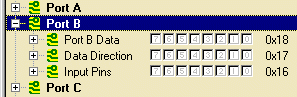
Open the Port B tree by double clicking
on the icon for the port. It will now expand and show all
registers associated with Port B, these are: Port B Data register
(PORTB), Data Direction (DDRB) and Input Pins (PINB). As shown
each bit in the registers are represented by a checkbox. A
logical 'zero' (0) is represented with the icon: ![]() and a logical
'one' (1) is represented by a checked checkbox:
and a logical
'one' (1) is represented by a checked checkbox: ![]() . These
checkboxes will be updated during program execution, and show the
current state of every bit. You may also set and clear these bits
by clicking on the appropriate checkbox at any time during the
program execution.
. These
checkboxes will be updated during program execution, and show the
current state of every bit. You may also set and clear these bits
by clicking on the appropriate checkbox at any time during the
program execution.
There are two commands to single step through the code. These are 'Step Over' <F10> and 'Trace Into' <F11> The difference between these commands is that <F10> do not trace into subroutines. Since our example does not contain any subroutines it is no difference between the operation of these commands in this example.
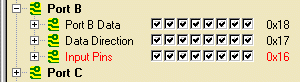
Now single step down to the last line of code (rjmp loop) by pressing repeatedly on the <F11> button or selecting Trace Into from the Debug menu. Notice how the colour changes from black to red on the registers that change value. This makes it easier to identify which registers that change value on each instruction. Continue pressing the <F11> button and se how the binary value in Port B is increased.
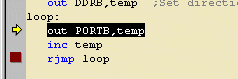
Breakpoints are a method of halting execution flow. By adding a breakpoint in the assembly code we can run run the program at full speed, and it will be stopped at the line with the breakpoint. By now you have noticed that you have to press <F11> three times to go through the loop once. We will add a breakpoint at the rjmp instruction to show how this can be used to speed up the debug process. Place the cursor on the 'rjmp' instruction in the source view window and press <F9> (or the 'Toggle Breakpoint' in the 'Breakpoints' menu ). A red square will appear in the left margin of the source view window as shown. By pressing <F5> or 'Go' from the 'Debug' menu the program will start running and break (stop) at the intruction with the breakpoint.
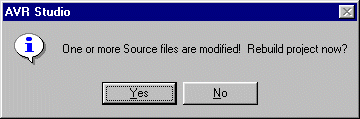
Now we want the program to count 'down' instead of up. To make this change we'll have to edit the source code. Place the cursor in the source view, and change the 'inc' to a 'dec' instruction. If you now press <F5> (Go) the following dialog box will appear. This box indicates that one of the source files has been changed, and that the project should be rebuildt. Press 'Yes'.
The Project will now be rebuildt, and the instruction pointer will start at first line of code. Notice how the breakpoint is remembered.
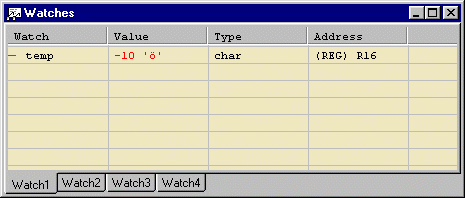
The Watch window is opened by pressing the ![]() icon.
icon.
Variables that are defined (by the .def directive) can be placed in the Watch view by draging them into the watch view. The only defined variable in this code is the 'temp' variable. Find this varable in the code, double click on it and drag it into the 'Watch view'. As we continue to run through the program the temp variable will constantly be updated during program execution.
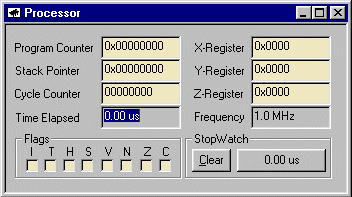
Now we will set up the Processor view.
Open this view by clicking on the Processor View icon: ![]() . This
view shows more processor specific information like the state of
the Flag register and the current value of the different pointers.
In this view you will also find a Cycle Counter and a StopWatch.
These are very useful if you wish to mesure the length of a loop
or how much time a specific subroutine uses. We will not use this
view directly in this example, but it provide a lot of useful
information during debugging of a project.
. This
view shows more processor specific information like the state of
the Flag register and the current value of the different pointers.
In this view you will also find a Cycle Counter and a StopWatch.
These are very useful if you wish to mesure the length of a loop
or how much time a specific subroutine uses. We will not use this
view directly in this example, but it provide a lot of useful
information during debugging of a project.
Before exiting AVR Studio we will save our project. AVR Studio will remember where the views are placed and will use this setting when opening the project later. To save the project select 'Save' from the 'Project' menu.