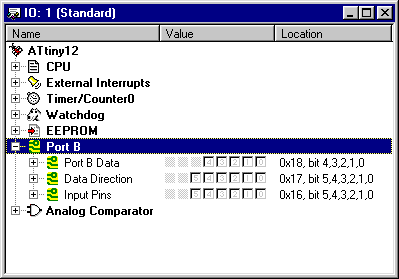
I/O window configuration
The I/O window is automatically configured by AVR Studio when opening a new I/O window
or opening an existing debug project. The window is configured by loading a
configuration file from disk. When a new I/O window is opened using the menu or
the button on the tool bar, AVR Studio autoloads the standard configuration for the
current device. When a debug project is closed down, AVR Studio autosaves the
configuration of the I/O window(s) to the project directory. Later, when the debug project
is reopened, AVR Studio automatically opens the I/O window(s) with the same configuration
as when the project was last closed down. This is all transparent to the user.
Contents
The I/O window is organized in a hierarchic way. This gives the user the
ability to have both a quick overview of the I/O registers and to go more in detail
if neccessary. The standard configuration give the user a quick overview of the hardware
with the ability to expand particular items for more information.
The I/O window contains three columns. The leftmost column displays the register or group names. Double-clicking in this column or clicking the expand box will expand or collapse the register item if it contains further information. The middle column displays the register value, where data can be displayed and edited in various ways. The rightmost column displays the byte address of the register, and additionally the bit numbers if some bits in the register are masked-out. Double-clicking in this column opens the Item Properties dialog for this item.

Data format
The value of a register can be displayed in various ways. By clicking the right mouse button, the
user can select between hexadecimal, decimal or binary representation of the value. In addition,
the data can be represented by check-boxes, making it possible to toggle the bits representing
the value.
In normal representation, editing of a value can be done by just starting to type, or by double-clicking in the data column. In both cases, an edit box containing the old value will pop up. Note: In the edit box, the values entered must be preceded by the prefix 0x to enter a hexadecimal value,0d or just digits for a decimal value, or 0b for a binary value.
Color Coding
Locations that changed since the last debug operation (Break/Single Step) will appear in red characters.
Navigating with the keyboard
The user can navigate the I/O window with the keyboard:
Up, down, Page Up, Page Down - Moves the cursor up and down in the window
Plus, Minus - Expands and collapses an item if it got sub items
Insert - Inserts an item
Delete - Removes an item
H - Hides an item and all its sub items
J - Shows hidden items