Volkswagen 01M Transmission. Manual - part 56
 

  Index      Volkswagen     Volkswagen 01M Transmission - service manual 2001 year


Search              


Content   ..  54  55  56  57   ..


Volkswagen 01M Transmission. Manual - part 56


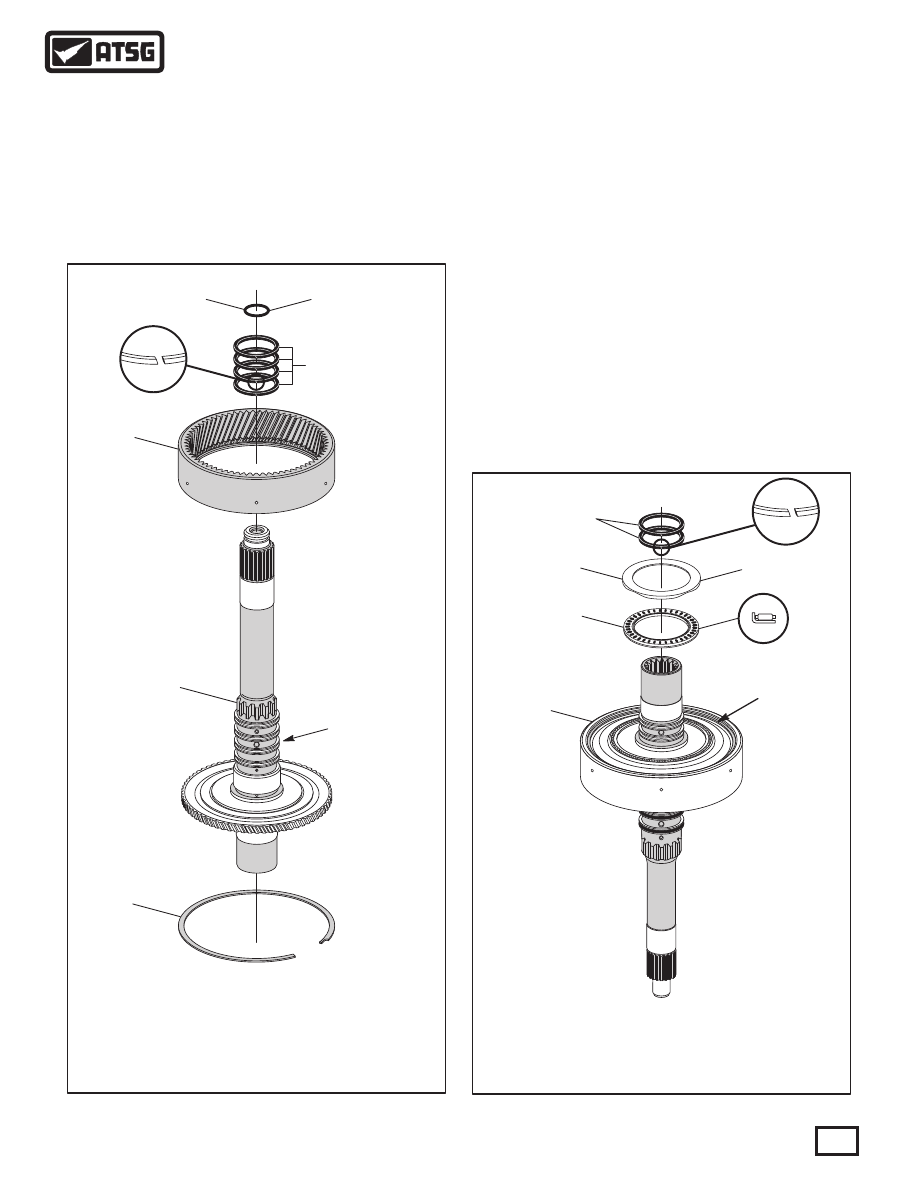
 224  4 RING TURBINE SHAFT (3 PORT MO DELS ONLY).
 227  TURBINE SHAFT REAR SEA L RINGS  (ALL MODELS).
 228  NUMBER 6 THRUST BEARING.
 229  NUMBER 6 THRUST BEARING RACE.

221

226

225

INSTALLED DURING

FINAL ASSEMBLY

INSTALLED DURING

FINAL ASSEMBLY

224

2-PORT MODEL

REQUIRES 3 SEAL

RINGS, AND 3-PORT

MODEL REQUIRES 4

2-PORT MODEL

REQUIRES 3 SEAL

RINGS, AND 3-PORT

MODEL REQUIRES 4

224

ENSURE SNAP RING

IS FULLY SEATED

ENSURE SNAP RING

IS FULLY SEATED

228

229

INSTALLS ON

K1 CLUTCH

HOUSING

INSTALLS ON

K1 CLUTCH

HOUSING

227

220

 220  TURBINE SHAFT FRONT SEAL RINGS.
 221  FRONT PL ANETARY RING GEAR.
 223  3 RING TURBINE SHAFT (2 PORT MO DELS ONLY).
 224  4 RING TURBINE SHAFT (3 PORT MO DELS ONLY).
 225  TURBINE SHAFT "O" RING (3 PO RT MODELS ONLY).
 226  FRONT PL ANETARY RING GEAR RETAINING SNAP RING.

83

Technical Service Information

FRONT PLANETARY ASSEMBLY (CONT'D)

COMPONENT REBUILD (CONT'D)

Continued on Page 84

     4. Install front planet ring gear on turbine shaft
             and secure with snap ring   (See Figure 148).
     5. Install required amount of turbine shaft sealing
             rings on turbine shaft, as shown in Figure 148.
       Note: The "O" ring on the turbine shaft pilot
       will be installed during final assembly.

Figure 148

Figure 149

     6. Turn the assembly over and install number 6 
             thrust bearing, the with needles facing up, as
       shown in Figure 149.
       Note: Number 6 thrust bearing race installs
       on to K1 clutch housing.
     7. Install two more sealing rings on back side of
             turbine shaft, as shown in Figure 149.
       Note: Ensure that ring gear snap ring is
       fully seated.

84

Technical Service Information

213

214

215

217

218

219

224

 213  NUMBER 3 THRUST WASHER (PL ASTIC).
 214  FRONT PL ANETARY SUN GEAR.
 215  FRONT PL ANETARY CARRIER ASSEMBLY.
 217  NUMBER 5 THRUST BEARING FRONT RACE.
 218  NUMBER 5 THRUST BEARING.
 219  NUMBER 5 THRUST BEARING REAR RACE.
 224  4 RING TURBINE SHAFT (3 PORT MO DELS ONLY).

Figure 150

215

216

 215  FRONT PL ANETARY CARRIER ASSEMBLY.
 216  NUMBER 4 THRUST WASHER (PL ASTIC).

Figure 152

Figure 151

FRONT PLANETARY ASSEMBLY (CONT'D)
     8. Install number 4 (white plastic) thrust washer 
             on back side of the front planetary carrier, as 
       shown in Figure 151.

     9. Install number 5 thrust bearing rear race, the
             number 5 thrust bearing and number 5 thrust
             bearing front race, as shown in Figure 150.
 10. Install the completed front planetary carrier, as
             shown in Figure 150, by rotating into position.
 11. Install the front sun gear into the carrier, as
             shown in Figure 150, by rotating into position.
 12. Install number 3 (white plastic) thrust washer,
       as shown in Figure 150.
 13. Set the completed front planetary aside for the
       final assembly process  (See Figure 152).

Component Rebuild

Continued on Page 86

COMPLETED FRONT PLANETARY

85

Technical Service Information

OIL PUMP AND ASSOCIATED PARTS, EXPLODED VIEW

3 U

65

66

67

68

69

70

71

72

64

63

62

"2 PORT"

MODELS ONLY

"3 PORT"

MODELS ONLY

61

60

75

74

75

76

77

78

79

80

73

 60  OIL PUMP CONVERTER HUB SEAL.
 61  OIL PUMP CONVERTER BUS HING (3 PORT ONLY).
 62  OIL PUMP CAGED BEARING SNAP RING (2 PORT ONLY).
 63  OIL PUMP CAGED BEARING (2 PORT ONLY).
 64  OIL PUMP TO CASE "O" RING SEAL.
 65  OIL PUMP BODY.
 66  OIL PUMP OUTER GEROTOR.
 67  OIL PUMP INNER GEROTOR.
 68  OIL PUMP COVER AND STATOR SHAFT ASSEMBLY.
 69  OIL PUMP COVER, K3 SEAL RINGS   (2 REQUIRED).
70  OIL PUMP COVER CAGED NEEDLE BEARING.

 71  NUMBER 1 THRUST WASHER STEEL RACE.
 72  NUMBER 1 THRUST WASHER (PL ASTIC).
 73  INPUT SHAFT SPEED SE NSOR  (G182).
 74  INPUT SHAFT SPEED SENSOR "O" RING SEAL.
 75  ISS SENSOR AND ISS CO NN. BOLTS, 16 MM (.630")  (2 REQ).
 76  B1 CLUTCH PISTON OUTER "O" RING SEAL.
 77  B1 CLUTCH PISTON.
 78  B1 CLUTCH PISTON INNER "O" RING SEAL.
 79  B1 CLUTCH PISTON RETURN SPRING ASSEMBLY.
 80  PUMP COVER RETAINING BOLTS, 17 MM (.670")  (9 REQ).

Figure 153

Refer to Figure 145 for

dimensional differences

Refer to Figure 145 for

dimensional differences

142

7

AT

142

7

AT

OUTSIDE DIAMETER

48.34 MM (1.903")

OUTSIDE DIAMETER

52.0 MM (2.047")

"INA" BEARING
NO. F-238394

OUTSIDE DIAMETER

OF SPLINE AREA

34.85 MM (1.372")

STATOR SHAFT LENGTH

100.30 MM (3.949")

STATOR SHAFT LENGTH

84.47 MM (3.325")

OUTSIDE DIAMETER

OF SPLINE AREA

31.04 MM (1.222")

FOR "2 PORT" CONVERTER

FOR "3 PORT" CONVERTER

Figure 154

OIL PUMP ASSEMBLY

COMPONENT REBUILD (CONT'D)

     1. Disassemble the oil pump assembly using
       Figure 153 as a guide.
       Note: Pump gerotors should be marked on
             face, with black "Sharpie", to be reinstalled 
             in the same direction as all gerotors are not
       marked by factory.
     2. Clean all oil pump parts thoroughly and dry
       with compressed air. 
     3. Inspect all oil pump assembly parts thoroughly             
       for any wear and/or damage, and replace as       
       necessary. 
       Caution: At the time of this printing there are
             not any new hard parts available from the
       manufacturer for this unit.

     4. Again, as a precaution, we are showing you
             the difference in the oil pump parts between 
             the "2-Port" and "3-Port" torque converters in
       Figure 154.
       Note: Everything in the oil pump assembly is
             the same, except for what is illustrated in
       Figure 154.

Continued on Page 87

86

Technical Service Information


Content   ..  54  55  56  57   ..