Volkswagen 01M Transmission. Manual - part 118

462
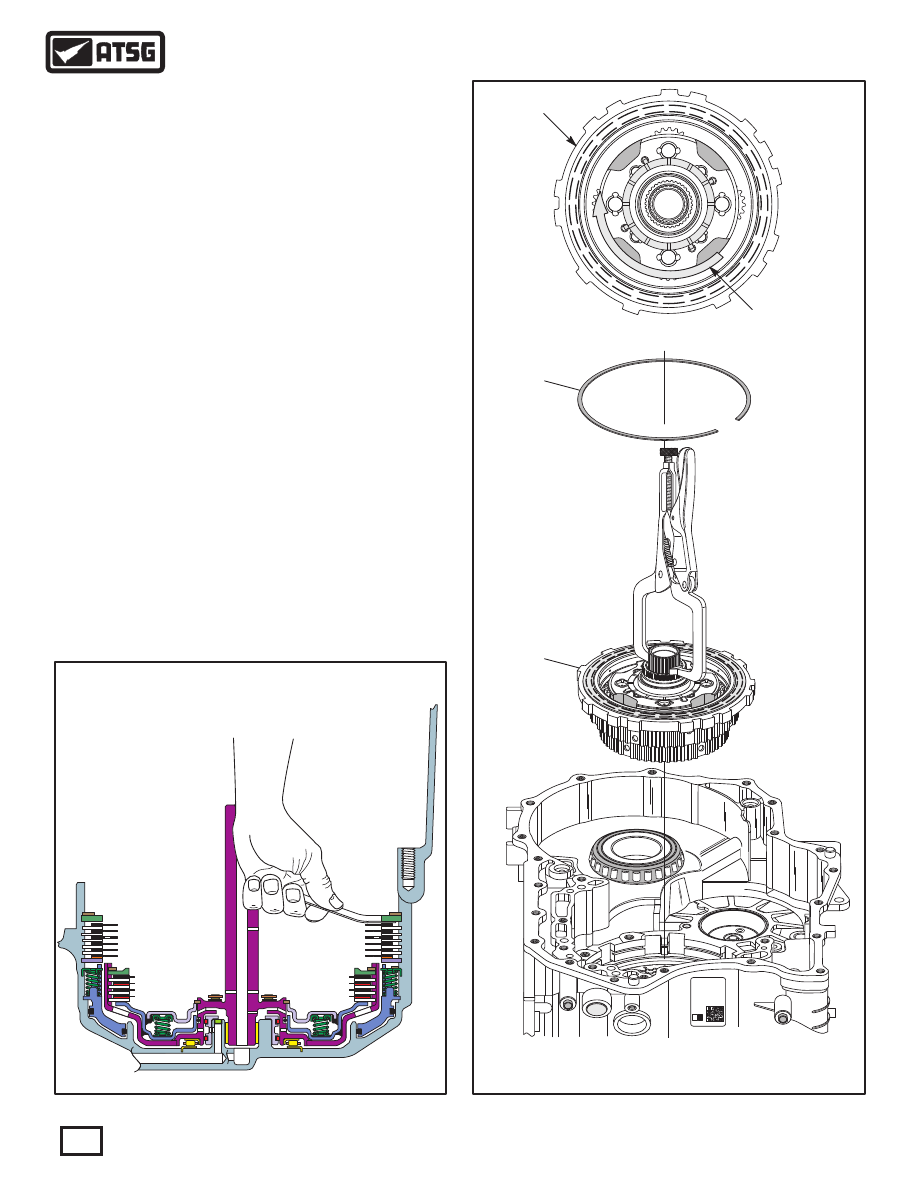
8. Measure the B2 clutch clearance with a feeler
gauge between the backing plate and friction
plate, as shown in Figure 170.
Note: There are no factory clutch clearance
specifications available, but the clearances
were the "traditional" .010" per friction plate
through-out this unit. Refer to Figure 170
for B2 clutch clearance with 6 frictions.
9. Install the pre-assembled F1 roller clutch and
rear planetary gear set, as shown in Figure 171,
by rotating back and forth until fully seated.
Note: The F1 roller clutch outer race lugs go
into case in only one position. The rear planet
must be rotated to engage the K2 clutch plates
and the B2 clutch plates. The assembly is fully
seated when the snap ring groove is visable.
10. Once the assembly is fully seated, remove the
vice-grips and install F1 roller clutch snap ring,
as shown in Figure 171, with snap ring opening
toward the transfer gear bearing race.
Note: This snap is .048" in thickness.
CAUTION: After installation, with your fingers
in the planetary carrier pockets, the carrier should
freewheel in a clockwise direction and lock in a
counter-clockwise direction (See Figure 171).
2
7
4051 - 1 - 1
03C2T02168
Z
0
300 035H
09G
1004
Figure 171
Figure 170
462 F1 ROLLER CLUTCH SNAP RING (.048" THICKNESS).
463 F1 ROLLER CLUTCH AND REAR GEAR SET ASSEMBLY.
463
Factory B2 Clutch Clearance
Was 1.68 MM (.066")
With 6 Frictions
Continued on Page 103
102
Technical Service Information
TRANSAXLE FINAL ASSEMBLY (CONT'D)
FR
L
E
E
E
EWH
Held By
Case
Carrier Should
Freewheel Clockwise