Volkswagen 01M Transmission. Manual - part 120
 

  Index      Volkswagen     Volkswagen 01M Transmission - service manual 2001 year


Search              


Content   ..  118  119  120  121   ..


Volkswagen 01M Transmission. Manual - part 120


AU

FA

AU

FA

VW 

G

 A

VW 

G

 A

GGZ

   2

80

303


0

028

3C

16

2T

G

0

035

 3

09

H

5

 2

7

-  0

34

51

 1

40

- 1

 -


T

68

03

C

1

2

02

O

Z

0

  0

5

3

0

3

H

9

0

G

04

10

136

7

4051 - 1 - 1

03C2T02168

Z

0

300  035H

09G

1004

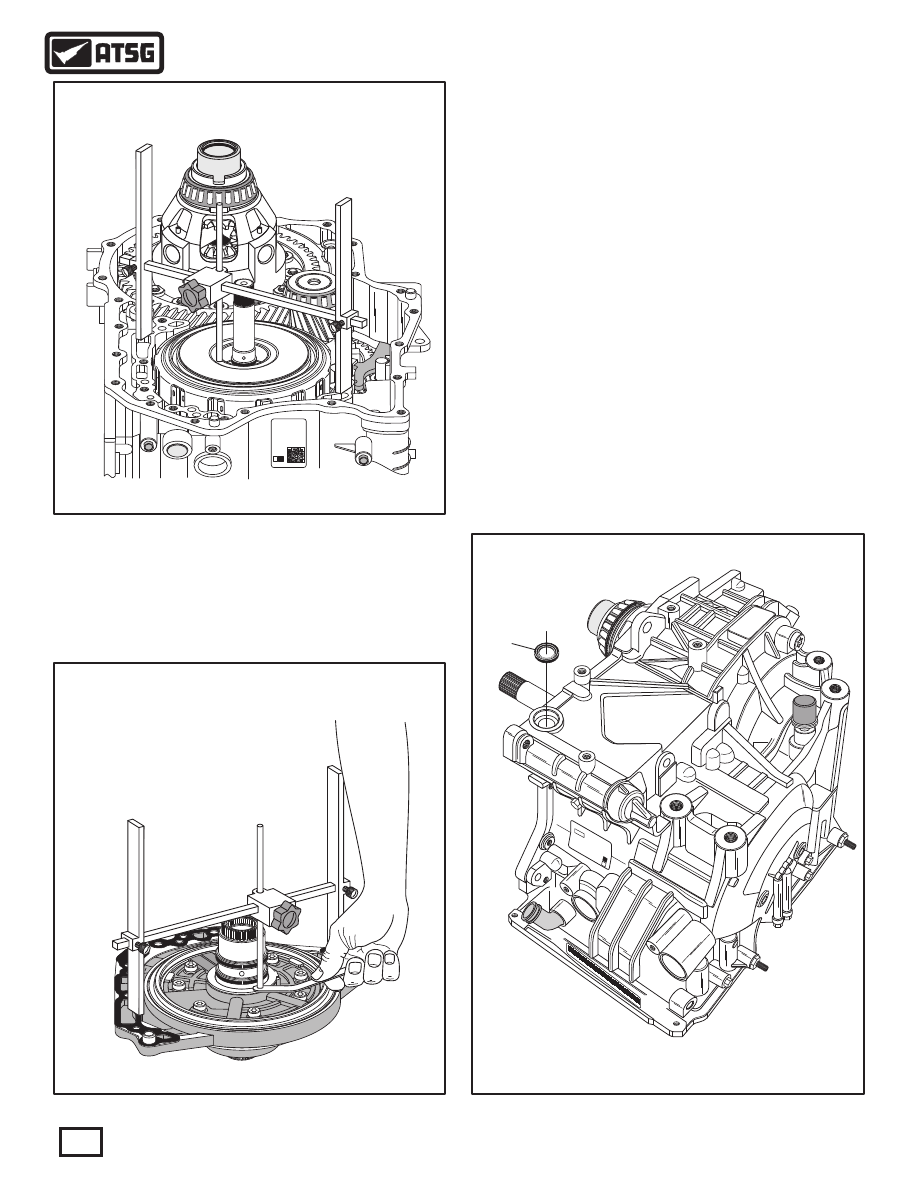
Figure 185

Figure 186

Figure 187

Transaxle End Play

Should be Approximately

0.52 MM (.020")

110

Technical Service Information

TRANSAXLE FINAL ASSEMBLY (CONT'D)

 46. Install "H" gage on transaxle pump surface, as
       shown in Figure 185, lower the adjustment rod
       to the surface of the number 1 thrust washer on
       the K3 clutch housing and tighten adjustment 
       rod locking knob.
 47. Now turn the "H" gage over and set it on the
       completed oil pump assembly, "with" the new
       design gasket and number 1 thrust washer in
       place, as shown in Figure 186.
 48. Measure with feeler gauge between adjustment
       rod and the number 1 thrust washer, as shown in
       Figure 186, to determine transaxle end-play.
 49. Transaxle end-play should be approximately
       0.52 MM (.020").
       Note: Currently there are no selective thrust
       washers available.
 50. Install new manual shaft seal using the proper
       seal driver  (See Figure 187).

Continued on Page 111

 136  MANUAL SHAFT SEAL.

AU

FA

AU

FA

VW 

G

 A

W

G

V

  A

GG

Z  

28

030

3


0

028

3C

16

2T

G

0

035

 3

09

H

5

 2

7

-  0

34

5

1

1


40

- 1

 -


3C

T

16

8

0

2

02

O

Z

0

  0

3

0


5

3

H

9G

0

04

10

Continued on Page 112

137

140

138

139

Figure 188

 137  MANUAL SHAFT.
 138  ROLLED PIN.
 139  INSIDE DETENT LEVER.
 140  PARKING ROD.

Figure 189

7

4051 - 1 - 1

03C2T02168

Z

0

300  035H

09G

1004

111

Technical Service Information

 51. Assemble the park rod to the inside detent lever,
       as shown in Figure 188.
 52. Install the inside detent lever and park rod into
       transaxle with park rod going through the park
       rod guide.
 53. Install the manual shaft through the case bore,
       through the inside detent lever, as shown in
       Figure 188.
 54. Align the holes in the inside detent lever and the
       manual shaft and install the rolled pin using a
       hammer and punch, as shown in Figure 189.

TRANSAXLE FINAL ASSEMBLY (CONT'D)

 56  OIL PUMP TO CASE GASKET  (LATE DESIGN).

112

Technical Service Information

Continued on Page 113

 55. Install new design pump to case gasket over the
       dowels on oil pump, as shown in Figure 191, and
       retain with a small amount of Trans-Jel®.
 56. Install two new case to converter cover seals in
       the case pockets, as shown in Figure 190, and
       retain with small amount of Trans-Jel®.

 57. Install the oil pump and gasket assembly, as
       shown in Figure 190.
       Note: Rotate the input shaft to engage oil pump
       into front sun gear splines.
 58. Install the 6 oil pump retaining bolts, as shown
       in Figure 190.
       Note: Pay close attention to the length of bolts
       as positioning is critical.
 59. Torque all 6 oil pump bolts to 19 N·m (14 ft.lb.),
       as shown in Figure 192.

TRANSAXLE FINAL ASSEMBLY (CONT'D)

Figure 191

7

4051 - 1 - 1

03C2T02168

Z

0

300  035H

09G

1004

32

61

C   

A

56

54

53

53

53

55

54

62

61

61

73

 53  OIL PUMP RETAINING BOLT (22 MM LENGTH, 3 REQUIRED).
 54  OIL PUMP RETAINING BOLT (30 MM LENGTH, 2 REQUIRED).
 55  OIL PUMP RETAINING BOLT (25 MM LENGTH, 1 REQUIRED).
 56  OIL PUMP TO CASE GASKETS  (LATE DESIGN).
 61  CONVERTER COVER TO CASE SEALS (2 REQUIRED).
 62  OIL PUMP ASSEMBLY.
 73  OIL PUMP TO K3 CLUTCH HOUSING THRUST WASHER  (NO. 1).

Figure 190

56

7

4051 - 1 - 1

03C2T02168

Z

0

300  035H

09G

1004

2

3

1  6 

C

A

TORQUE PUMP BOLTS TO

19 N·M (14 FT.LB.)

Figure 192

 60. Lube oil pump "O" ring and seal surface of the
       converter cover with Trans-Jel®.
 61. Apply 1/8 inch bead of RTV sealant to converter
       cover, as shown in Figure 193.
 62. Ensure oil pump to converter cover seal is still
       in place, as shown in Figure 195.

 63. Install the converter cover assembly, as shown in
       Figure 195, using the chart in Figure 194 for the
       bolt locations.
 64. Torque all converter housing retaining bolts to
       19 N·m (14 ft.lb.).

Figure 194

{

{

1 Behind Bell

Housing Here

21 Total

2 Behind Bell

Housing Here


 "B" = BOLT 83 MM LENGTH  (1 REQUIRED).
 "C" = BOLT 45 MM LENGTH  (1 REQUIRED).

"A" = BOLT 30 MM LENGTH (17 REQUIRED.

B

A

A

A

A

A

A

A

A

A

A

A

A

C

A

A

A

A

D

D

113

Technical Service Information

Figure 193

TRANSAXLE FINAL ASSEMBLY (CONT'D)

7

4051 - 1 - 1

03C2T02168

Z

0

300  035H

09G

1004

32

1  6 

C

A

 49  BOLT 30 MM LENGTH  (17 REQUIRED).
 50  BOLT 45 MM LENGTH  (1 REQUIRED).
 51  BOLT 83 MM LENGTH  (1 REQUIRED).
 52  STUD BOLT 30 MM LENGTH  (2 REQUIRED)

Figure 195

49

50

52

51

1/8" BEAD OF

RTV SEALANT

Continued on Page 114


Content   ..  118  119  120  121   ..