Volkswagen 01M Transmission. Manual - part 122
 

  Index      Volkswagen     Volkswagen 01M Transmission - service manual 2001 year


Search              


Content   ..  120  121  122  123   ..


Volkswagen 01M Transmission. Manual - part 122


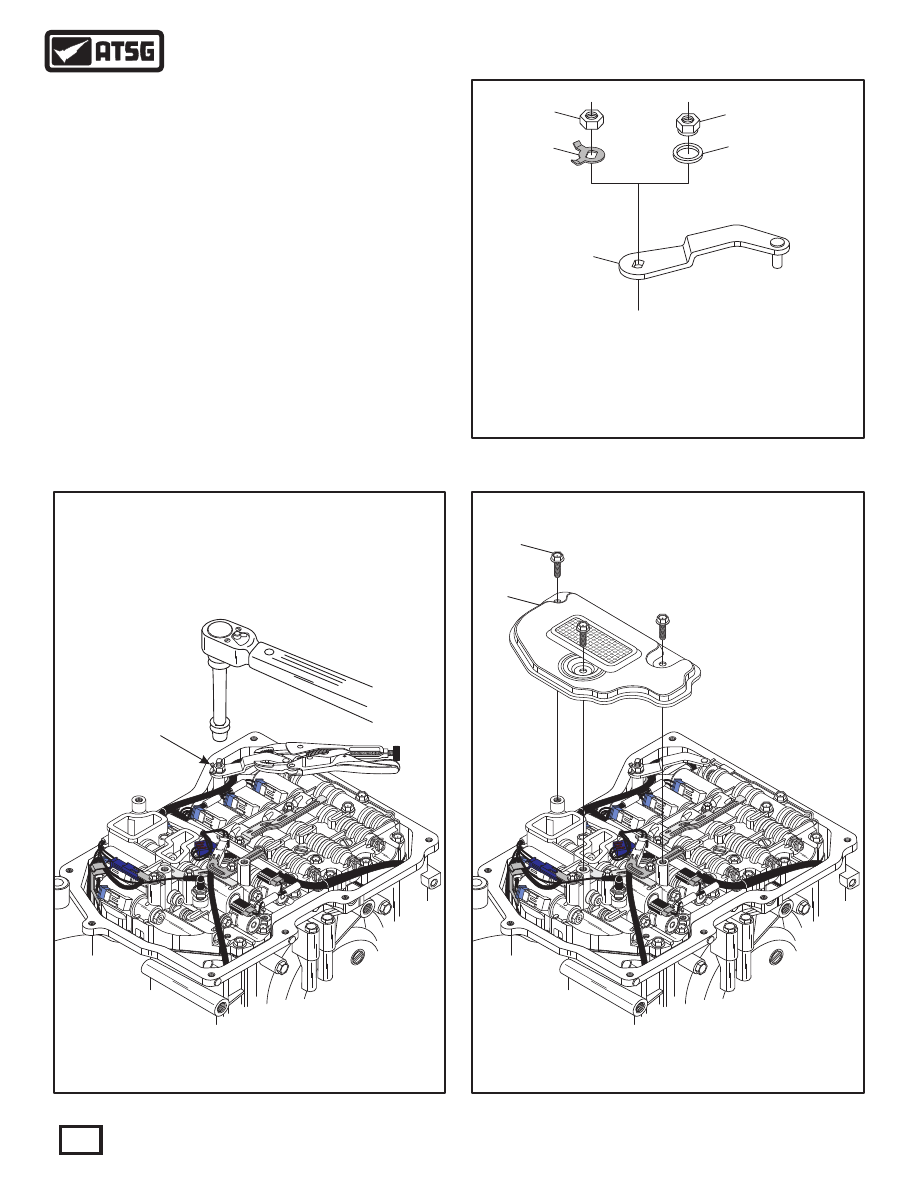
 21  MANUAL SHAFT LEVER RETAINING NUT (SOME MODELS).
 22  RETAINING NUT LOCKING TAB WASHER (SOME MODELS).
 23  MANUAL SHAFT LEVER NUT WITH SHOULDER (SOME MODELS).
 24  MANUAL SHAFT LEVER CENTERING WASHER (SOME MODELS).
 25  INTERNAL MANUAL SHAFT LEVER.

0

917

T1

C

7

3C0

07

08

A

0

4

7CA

3C0

70

5B

3A01371

Y

5

X3

01

7

6

B

A

0

5C

B3

B0

0

04

0

4A

0

0

U3

C0

1

0

118

Technical Service Information

 17  OIL FILTER  (MODEL DEPENDANT).
 20  OIL FILTER RETAINING BOLTS  (3 REQUIRED).

Figure 205

Figure 204

 17  OIL FILTER  (MODEL DEPENDANT).
 20  OIL FILTER RETAINING BOLTS  (3 REQUIRED).

17

20

TRANSAXLE FINAL ASSEMBLY (CONT'D)

Continued on Page 119

0

917

1

T

C

0

0

7

3C0

7

8

A

07

4

7CA

3C0

0

5B

3A0

13

71

Y

5

X3

01

7

6

B

A

0

5C

B3

B0

0

04

0

4A

00

0

U3

C

1

0

Figure 203

SOME MODELS USE A

LOCKING TAB WASHER

FOR THE NUT

 84. Some models use a locking tab washer and some
       models use a self locking nut with a centering
       washer below the nut.  The models with the self
       locking nut have a shoulder on the nut that faces
       down toward the "centering" washer, as shown
       in Figure 204.
 85. Using a pair of vice-grips to hold inside manual
       lever, as shown in Figure 203, torque the manual
       lever nut to 7 N·m (62 in.lb.).
 86. Install new oil filter, as shown in Figure 205 and
       torque the three bolts to 11 N·m (97 in.lb.).

21

22

25

23

24

0

917

1

T

7C

3

00

708

A

C

0

4

7

A3

0

7

C

C

0

01

371

5B

Y3A

1

6

5B

X3

A0

70

5C

B3

B0

04

00

A

4

U3C

00

100

VW

  AG

J

73

-0

P  5

44

2

 3

9G

1 3

0

2

61

>e

<

F

/Zo

119

Technical Service Information

0

917

1

T

C

7

3C00

708

A

0

4

7C

A3

C0

70

5B

3

01

371

Y

A

5

X3

01

7

6

B

A

0

5C

B3

B0

0

04

0

4A

0

0

U3C

0

1

0

 11  BOTTOM OIL PAN  (MODEL DEPENDANT).
 12  OIL PAN "STAND-PIPE"  (MODEL DEPENDANT).
 13  OIL LEVEL CHECK PLUG SEALING WASHER.
 14  OIL LEVEL CHECK PLUG.
 15  OIL PAN BOLTS  (8 REQUIRED ON  "09G").
 16  OIL PAN GASKET.

G

VW  

A

573

44

P  

-02

J

09G

321

36

1


>

Zo

e/

<

F

11

12

13

14

16

15

Figure 206

TRANSAXLE FINAL ASSEMBLY (CONT'D)

Continued on Page 120

 87. Install new oil pan gasket to oil pan, as shown in
       Figure 206.
       Note: Pan gaskets have spacers incorporated
       in the gasket to prevent over-torque, and must
       be in place for all pan bolts.

 CAUTION: Now is the time to recheck all of the 
electrical connections, all harness' in their proper 
retainers, no pinched wires, filter in place, etc......

 88. Install oil pan and gasket on transaxle, as shown
       in Figure 206 and install oil pan bolts.
       Note: Refer to Pages 38 and 39 for the various
       stand -pipes and oil pans on the various models.
 89. Torque the oil pan bolts to 7 N·m (62 in.lb.), as
       shown in Figure 207.
 90. Torque oil pan drain plug to 27 N·m (20 ft.lb.).

Figure 207

TORQUE OIL PAN BOLTS TO

11 N·M (97 IN.LB.)

 91. Install the transaxle range switch, as shown in
       Figure 208, torque bolts to 11 N·m (97 in.lb.).
 92. Install new special "O" ring seal on bottom of
       integral cooler, as shown in Figure 209, retain
       with small amount of Trans-Jel®.
       Note: This "O" ring seal has centering tabs
       cast into the inside diameter (See Figure 209).
 93. Install the integral cooler assembly on converter
       housing, as shown in Figure 208.
       Note: Cooler has a tab that must be inserted
       in recess of converter cover.  All models are not
       equipped with this recess (See Figure 208).
 94. Install flat washer on integral cooler retaining
       bolt first, then install cone shaped washer on the
       retaining bolt, as shown in Figure 208.
 95. Install new "O" ring seal and install the integral
       cooler retaining bolt, as shown in Figure 208.
 96. Torque the integral cooler retaining bolt to
       35 N·m (26 ft.lb.), using 10 mm allen socket..
 97. Install the integral cooler flow control pipe into
       cooler inlet pipe, if used, as shown in Figure 208.
       Note: For flow control, a distributor pipe is
       installed into the supply side of the integral
       cooler on some models only.  Do not install
       flow control pipe in the return side of the
       integral cooler.

AU

A

F

AU

FA


G

VW

 A

A

W  

G

V


G


80

G

Z

2

3

30

C

02

03

2

168

T

005

0

3

H

9

 03

-

73


5

44

  0

2

40

- 1

51


1


2

03

T0

8

C

21

6

O

Z

3


3

0

0

5

0

H

09

G

00

4

1

   2  TRANSAXLE RANGE SWITCH.
   3  TRANSAXLE RANGE SWITCH RETAINING BOLTS  (2 REQUIRED).
   4  INTEGRAL COOLER TO CASE SPECIAL "O" RING SEAL.
   5  INTEGRAL COOLER ASSEMBLY.
   6  "O" RING SEAL.
   7  FLAT WASHER.
   8  CONE SHAPED LOCKING WASHER.
   9  INTEGRAL COOLER RETAINING BOLT.
 10  INTEGRAL COOLER FLOW CONTROL PIPE  (SOME MODELS).

   4  INTEGRAL COOLER TO CASE SPECIAL "O" RING SEAL.
   5  INTEGRAL COOLER ASSEMBLY.

2

3

4

4

TABS

TAB MUST BE

INSERTED IN RECESS

IN HOUSING

TAB MUST BE

INSERTED IN RECESS

IN HOUSING

5

5

6

7

8

9

10

TRANSAXLE FINAL ASSEMBLY (CONT'D)

Continued on Page 121

120

Technical Service Information

Figure 208

Figure 209

121

Technical Service Information

AU

FA

U

A

FA

VW 

A

  G

  G

VW

  A

3

G

 2

0

Z  

8

3

G

0

0

T

1

8

3

2

2

6

C

0

0

 3

0

H

9

0

 03

5

G


5

4

2

7

4

 -  

0

3

51


40

-

 1


-

C

03

0

T

6

2

1

8

2

O

Z

3

H

30


5

0

0

0

G

9

004

1

Q

E

AA

Torque

Converter

Code Letters

TORQUE CONVERTER

Figure 210

TRANSAXLE FINAL ASSEMBLY (CONT'D)

CONGRATULATIONS

YOU ARE FINISHED!

"09G" CONVERTER MEASUREMENT

  98. Lubricate the outside diameter of the converter
        hub with small amount of Trans-Jel®, and install
        torque converter, as shown in Figure 210.
  99. Measure distance "A" from the torque converter
        pad to the face of converter housing, as shown
        in Figure 211.
100. If converter is properly installed, distance "A"
        will be approximately 20.5mm (0.800").

"A"

Figure 211


Content   ..  120  121  122  123   ..