Volkswagen 01M Transmission. Manual - part 101
 

  Index      Volkswagen     Volkswagen 01M Transmission - service manual 2001 year


Search              


Content   ..  99  100  101  102   ..


Volkswagen 01M Transmission. Manual - part 101


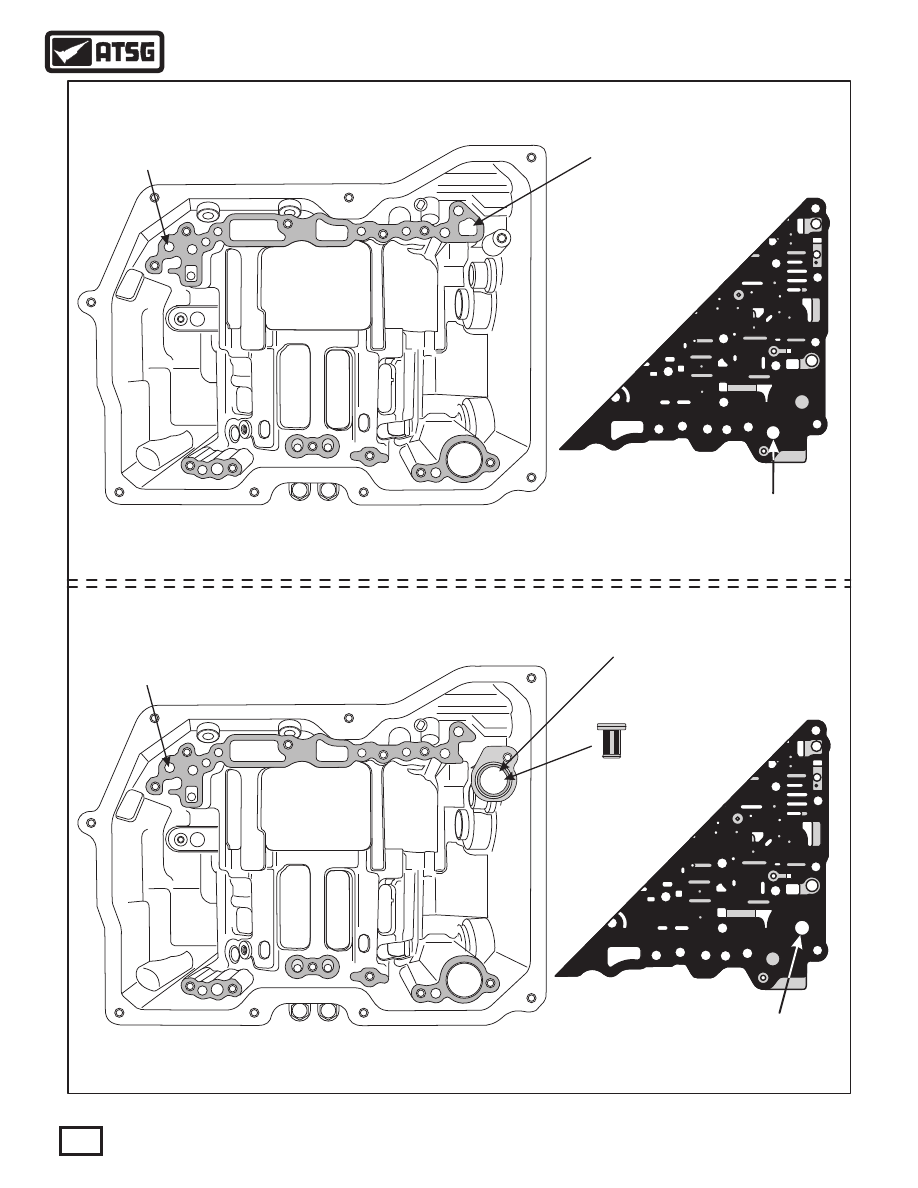
Figure 38

Cooler/Lube

Filter

Valve Body And

Spacer Plate With

Hole In This Location
For Lube Distribution

Valve Body And

Spacer Plate With

Hole In This Location
For Lube Distribution

Remote Cooler

Return

To Remote

Cooler

To Integral Cooler

Mounted On The

Converter Housing

Integral Cooler Return

For Lube Distribution

CASE AND VALVE BODY SPACER PLATE IDENTIFICATION WITH "INTEGRAL COOLER"

CASE AND VALVE BODY SPACER PLATE IDENTIFICATION WITH "REMOTE COOLER"

34

Technical Service Information

7

7

0  

240

40

5

. 7

2433 a

20

0

Figure 39

CASE PASSAGE IDENTIFICATION WITH "INTEGRAL COOLER"

CASE PASSAGE IDENTIFICATION WITH "REMOTE COOLER"

Differential Lube

From VB (2)

Differential Lube

From VB (2)

Front Planet

Lube (2)

Front Planet

Lube (2)

K3 Clutch

K3 Clutch

K1 Clutch

K1 Clutch

B1 Clutch

B1 Clutch

Pump Outlet

(Line)

Pump Outlet

(Line)

Pump Inlet

(Suction)

Pump Inlet

(Suction)

Blocked

By Pump

Blocked

By Pump

TCC

Release

TCC

Release

TCC

Apply

TCC

Apply

To Cooler

From VB (2)

To Remote Cooler

From VB (2)

Cooler Return

To VB (7)

Thru Pump

To Remote Cooler

Thru Pump (7)

To Remote Cooler

From Pump (8)

To B1 Clutch

Pressure Tap

To B1 Clutch

Pressure Tap

To Remote

Cooler

Remote Cooler

Return

Cooler Return

To VB (4)

Thru Pump

Transaxle Case

(Conv. Cover Side)

Transaxle Case

(Conv. Cover Side)

35

Technical Service Information

Figure 40

Pump Outlet

(Line)

Pump Outlet

(Line)

Pump Inlet

(Suction)

Pump Inlet

(Suction)

PUMP PASSAGE IDENTIFICATION (CONV. COVER SIDE) WITH "REMOTE COOLER"

PUMP PASSAGE IDENTIFICATION (CONV. COVER SIDE) WITH "INTEGRAL COOLER"

TCC Release

TCC Release

B1

B1

K1

K1

K3

K3

Front Planet

Lube (3)

Front Planet

Lube (3)

Cooler Return

To VB (6)

Thru Pump

Cooler Return

To VB (5)

Thru Pump

To B1 Pressure Tap

Cooler Return

To VB (6)

Thru Pump

To Remote Cooler

Thru Pump (6)

To B1 Pressure Tap

TCC Apply

TCC Apply

36

Technical Service Information

Required Fluid

Level In Pan

Bottom Pan

Magnet

Oil Level

Check Plug

   To  "Check"  for  the  correct  fluid  level,  you  must 
remove the check plug, which is located in the corner 
of the pan, and is removed with a 10 mm allen wrench, 
as shown in Figure 41.
   We have provided you with a cut-away drawing of 
the bottom oil pan and the check plug so that you will 
understand how this system works.  Notice that the oil 
pan actually has a "stand-pipe", as shown in Figure 
42, that screws into the check plug hole and extends 
up into the bottom pan, which is our way to establish 
the proper fluid level in the transaxle.   By removing 
the "Check" plug from the oil pan, the fluid should just 
trickle  over  the  "stand-pipe"  and  out  through  the 
center of the stand-pipe in the oil pan, as shown in 
Figure 43.  
   The "stand-pipe" can be removed with the 10mm 
allen socket to facilitate draining the transaxle fluid 
from the bottom pan.

   To "Fill" or "Add" fluid to the transaxle you must 
use  the  fill  pipe,  usually  located  by  the  front  case 
connector, as shown in Figure 35.  Some units have a 
plug  in  this  location  and  some  units  have  neither, 
usually the remote cooler models.
    If  your  unit  does  not  have  a  fill  pipe,  the  only 
alternative is to use a pump and fill through the check 
plug and stand pipe.  Only the approved type of ATF 
fluid should be used, as shown below.

CHECK FLUID LEVEL AND SPECIFICATION

CHECKING TRANSAXLE FLUID LEVEL

Fluid Level

Stand-Pipe

Check

Plug

Figure 41

Figure 42

Figure 43

37

Technical Service Information

Fluid Requirements

VW Part No.  G 052 025 A2

BMW Part No.  M-83220416600

(Esso JWS 3309) Lifetime Fluid

Note:    If  the  "stand-pipe"  is  removed,  it  must  be 
installed  by  hand  tightening  only  with  the  allen 
socket and ensure it is completely seated.  If not, the 
fluid level will not be correct and the bottom of the 
check plug may seat against the stand-pipe instead 
of seating on check plug sealing washer.


Content   ..  99  100  101  102   ..