Volkswagen 01M Transmission. Manual - part 105
 

  Index      Volkswagen     Volkswagen 01M Transmission - service manual 2001 year


Search              


Content   ..  103  104  105  106   ..


Volkswagen 01M Transmission. Manual - part 105


7

4051 - 1 - 1

03C2T02168

Z

0

300  035H

09G

1004

32

1  6 

C

A

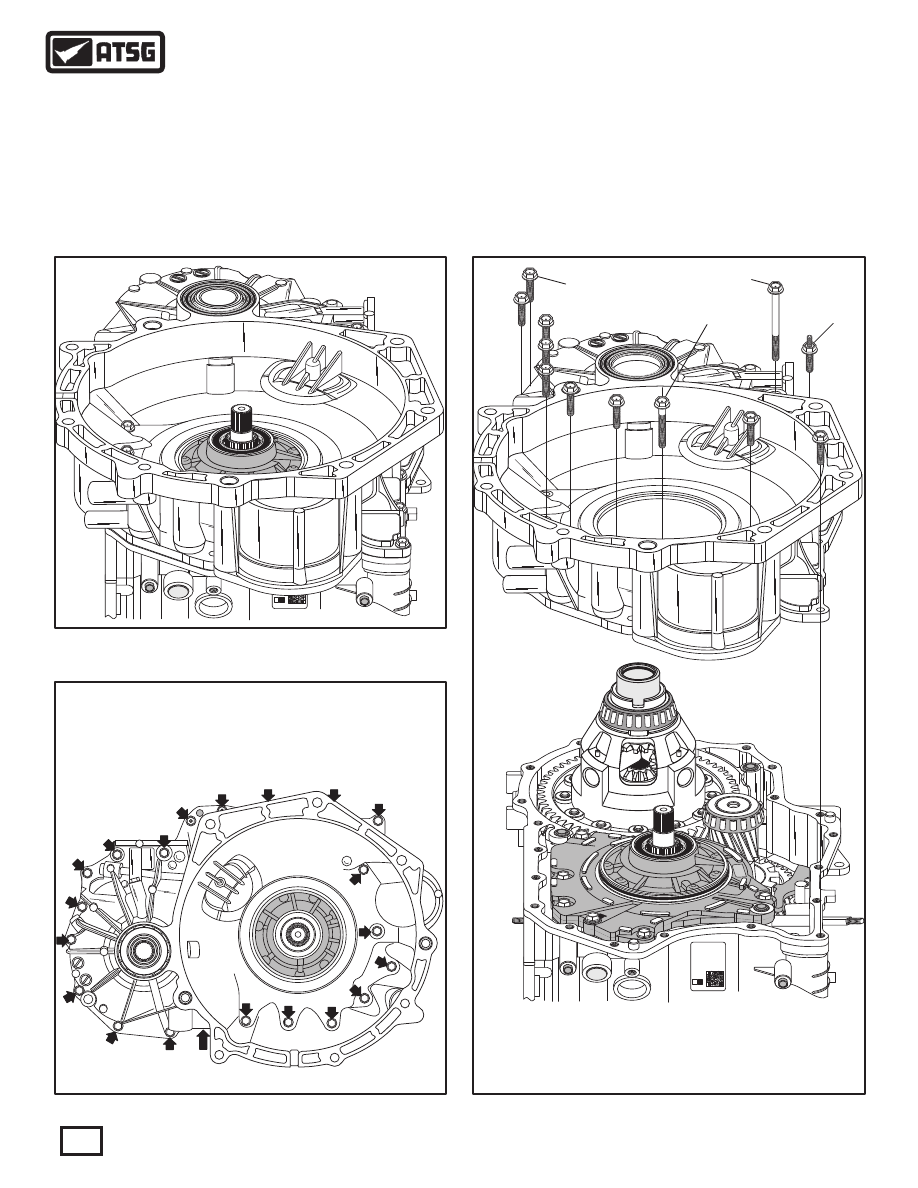
 49  BOLT 30 MM LENGTH  (17 REQUIRED).
 50  BOLT 45 MM LENGTH  (1 REQUIRED).
 51  BOLT 83 MM LENGTH  (1 REQUIRED).
 52  STUD BOLT 30 MM LENGTH  (2 REQUIRED)

 33. Remove the converter housing from transaxle
       case by tapping with a mallet to loosen housing
       from dowels and sealant  (See Figure 66).
 34. Set the converter housing aside for component
       rebuild section.

 31. Position transaxle so that converter housing is
       facing up, as shown in Figure 64.
 32. Remove the 21 converter housing bolts shown in
       Figure 65, using a 12 mm socket or wrench.
       Note: Converter housing bolt configuration
       will vary depending on model and year.  Some
       locations have "stud" bolts (See Figure 65).

Continued on Page 51

TRANSAXLE DISASSEMBLY (CONT'D)

TRANSAXLE DISASSEMBLY (CONT'D)

Figure 65

Figure 66

Figure 64

{

{

1 Behind Bell

Housing Here

21 Total

2 Behind Bell

Housing Here

7

4051 - 1 - 1

03C2T02168

Z

0

300  035H

09G

1004

49

50

52

51


 "B" = BOLT 83 MM LENGTH  (1 REQUIRED).
 "C" = BOLT 45 MM LENGTH  (1 REQUIRED).

"A" = BOLT 30 MM LENGTH (17 REQUIRED.

B

A

A

A

A

A

A

A

A

A

A

A

A

C

A

A

A

A

D

D

50

Technical Service Information

7

4051 - 1 - 1

03C2T02168

Z

0

300  035H

09G

1004

32

6 1 

C

A

 35. Remove the six oil pump retaining bolts, as
       shown in Figure 67.
       Note: There are 3 different lengths and position
       is critical.  Label if necessary.
 36. Remove the oil pump assembly, as shown in
       Figure 67, and set aside for component rebuild.
       Note: Number 1 thrust washer may be stuck
       to back of oil pump  (See Figure 67).
 37. Remove and discard the three oil pump to case
       gaskets, as shown in Figure 67.
       Note: New design pump gasket with all three
       gaskets mounted on steel core is included in
       Trans-Tec® gasket set  (See Figure 67).
 38. Remove and discard the two case to converter
       cover seals, as shown in Figure 67.
 39. Measure the distance from case pump surface to
       the washer surface on the K3 clutch housing, as
       shown in Figure 68, using a straight edge and
       ruler, or a depth micrometer.
       Note: Record this measurement to use in the
       reassembly process.

Continued on Page 52

TRANSAXLE DISASSEMBLY (CONT'D)

Figure 68

Figure 67

 53  OIL PUMP RETAINING BOLT (22 MM LENGTH, 3 REQUIRED).
 54  OIL PUMP RETAINING BOLT (30 MM LENGTH, 2 REQUIRED).
 55  OIL PUMP RETAINING BOLT (25 MM LENGTH, 1 REQUIRED).
 56  OIL PUMP TO CASE GASKETS  (EARLY DESIGN).
 61  CONVERTER COVER TO CASE SEALS (2 REQUIRED).
 62  OIL PUMP ASSEMBLY.
 73  OIL PUMP TO K3 CLUTCH HOUSING THRUST WASHER  (NO. 1).

56

54

53

53

53

55

56

54

56

62

NEW DESIGN OIL

PUMP GASKET

61

61

73

51

Technical Service Information

7

4051 - 1 - 1

03C2T02168

Z

0

300  035H

09G

1004

3

4

5

1

2

S

t

t

ar

t

re

9

8

0

AU

FA

AU

FA

VW 

G

 A

VW 

G

 A

G

280

3

GZ


03

02

03C

8

2T

16

0

035

093

H

5

4 -

 02

734


51

 1

40

- 1

 -


03

C

T

16

8

2

2

0

O

Z

0

  0

3

0


5

3

H

9

0

G

04

10

136

137

140

138

139

Figure 70

Figure 69

Continued on Page 53

 40. Remove the "rolled" pin from the inside detent
       lever using a 3/16" punch and hammer, as shown
       in Figure 69.
       Note: There is a safety band around the inside
       detent lever that must be removed first.  Only
       way to get it off is to break it and discard it.
       The safety band will not be reused.
 41. Remove the manual shaft from the top side of
       the transaxle, as shown in Figure 70, by sliding
       out through the inside detent lever and the case
       bore.
 42. Remove the inside detent lever and park rod, as
       shown in Figure 70.
 43. Remove and discard the manual shaft seal in the
       case, as shown in Figure 70.

TRANSAXLE DISASSEMBLY (CONT'D)

7

4051 - 1 - 1

03C2T02168

Z

0

300  035H

09G

1004

 136  MANUAL SHAFT SEAL.
 137  MANUAL SHAFT.
 138  ROLLED PIN.
 139  INSIDE DETENT LEVER.
 140  PARKING ROD.

52

Technical Service Information

7

4051 - 1 - 1

03C2T02168

Z

0

300  035H

09G

1004

420

100

111

113

7

8

4051 - 1 - 1

03C2T02168

Z

0

300  035H

09G

1004

Continued on Page 54

 44. Remove the B1 clutch apply ring and return
       spring assembly, as shown in Figure 71.
 45. Remove the K3 clutch housing assembly, as
       shown in Figure 71, and set aside for the
       component rebuild section.
       Note: Number 2 thrust washer may be stuck
       to back of K3 clutch housing.
 46. Remove the front planetary as an assembly, by
       lifting assembly straight up using the input shaft,
       as shown in Figure 72.

TRANSAXLE DISASSEMBLY (CONT'D)

53

Technical Service Information

Figure 71

Figure 72

 100  K3 CLUTCH HOUSING ASSEMBLY.
 111  NUMBER 2 THRUST WASHER.
 420  B1 CLUTCH APPLY RING AND RETURN SPRING ASSEMBLY.

 113  FRONT PLANETARY ASSEMBLY.


Content   ..  103  104  105  106   ..