Volkswagen 01M Transmission. Manual - part 108

550
552
553
554
555
556
557
558
559
560
556
554
551
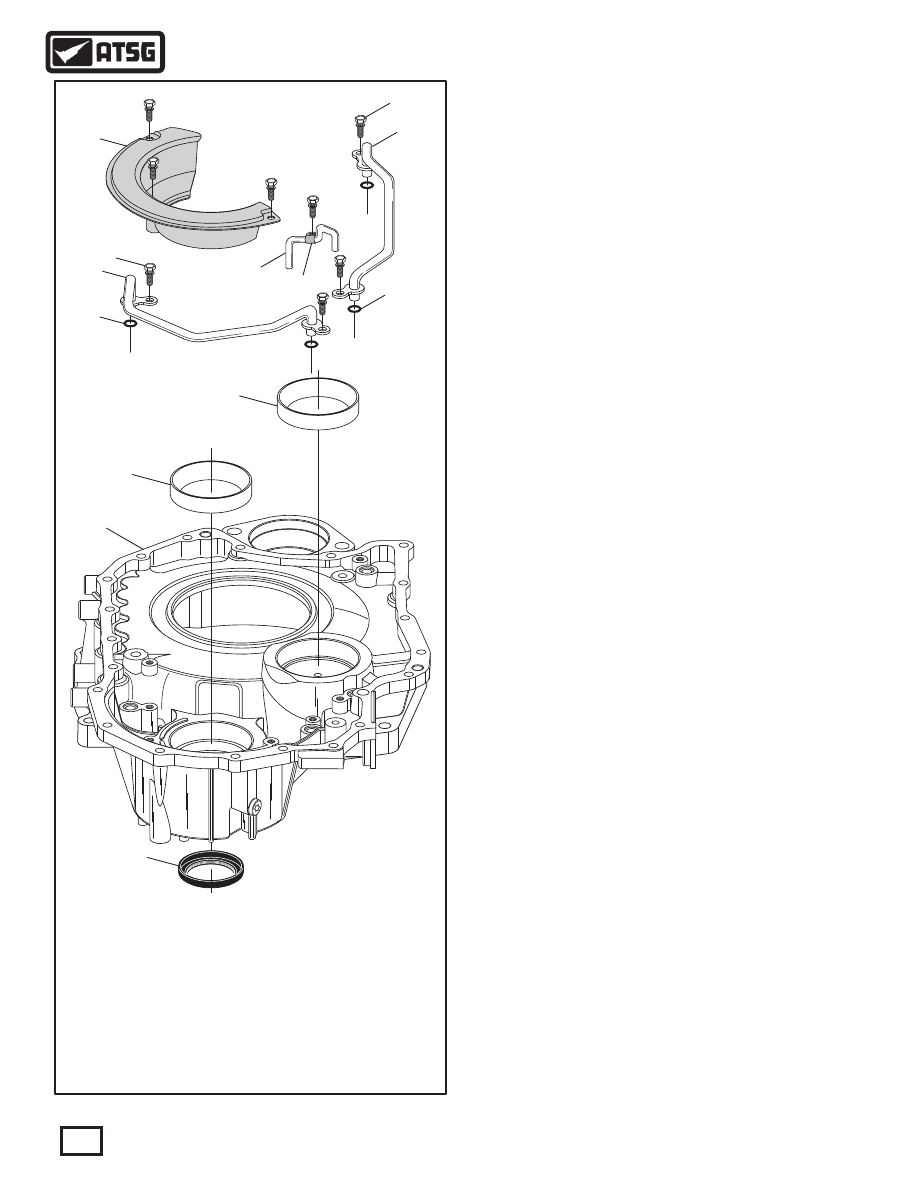
550 CONVERTER COVER ASSEMBLY.
551 RIGHT HAND AXLE SEAL.
552 TAPERED ROLLER BEARING RACE (FINAL DRIVE).
553 TAPERED ROLLER BEARING RACE (TRANSFER/PINION SHAFT).
554 OIL PIPE "O" RING SEALS (4 REQUIRED).
555 LOWER OIL PIPE ASSEMBLY.
556 RETAINING BOLTS WITH WASHER, 11MM LONG (8 REQUIRED).
557 FINAL DRIVE OIL BAFFLE.
558 CENTER OIL PIPE.
559 CENTER OIL PIPE RETAINING BRACKET.
560 UPPER OIL PIPE ASSEMBLY.
COMPONENT REBUILD
CONVERTER COVER ASSEMBLY
Figure 89
1. Disassemble the converter cover parts using
Figure 89 as a guide.
2. Clean all converter cover parts thoroughly and
dry with compressed air.
3. Inspect all converter cover parts thoroughly and
replace as necessary.
4. Install new "O" ring seals on the 2 large diameter
oil pipes, as shown in Figure 89, and lube with a
small amount of Trans-Jel®.
5. Install the two large diameter pipes, as shown in
Figure 89,and torque the four retaining bolts to
8 N·m (70 in.lb.).
6. Install the center oil pipe by pressing into place,
as shown in Figure 89, and torque the retaining
bolt to 8 N·m (70 in.lb.).
7. Install the final drive oil baffle, as shown in
Figure 89, and torque bolts to 8 N·m (70 in.lb.).
8. Install new right hand axle seal, as shown in
Figure 89, using the proper seal driver.
9. Lube the inside diameter of the axle seal with a
small amount of Trans-Jel.
10. Install new tapered roller bearing races as
necessary.
11. Set the completed converter cover assembly aside
for final transaxle assembly.
Component Rebuild
Continued on Page 63
62
Technical Service Information
WARNING: At time of this printing, there are not
any new "hard parts" available from the
manufacturer for this unit. The only source will be
used aftermarket suppliers.